
Si prefiere, nuestro traductor, y solicitarle que lo realice antes.
Posiblemente necesite
- Alicates
- Cuchillo
- Cinta de enmascarar
- Lápiz
- Destornilladores
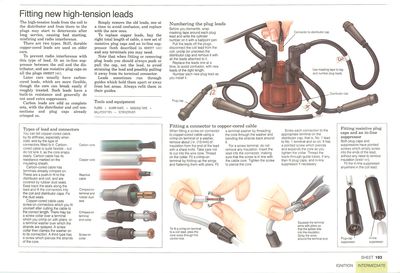
Numbering the plug leads
Before you dismantle, wrap masking tape around each plug lead and write the cylinder number on it with a ballpoint pen.
Pull the leads off the plugs, disconnect the coil lead from the coil, unclip (or unscrew) the distributor cap and remove it with all the leads attached to it.
Replace the leads one at a time, to avoid confusion, with new leads of the right length.
Number each new plug lead as you install it.
The high-tension leads from the coil to the distributor and from there to the plugs may start to deteriorate after long service, causing bad starting, misfiring and radio interference.
There are two types. Stiff, durable copper-cored leads are used on older cars.
To prevent radio interference with this type of lead, fit an in-line suppressor between the coil and the distributor, and use resistive plug caps on all the plugs (See Identifying and suppressing radio interference).
Later cars usually have carbon-cored leads, which are more flexible, though the core can break easily if roughly treated. Such leads have a built-in resistance and generally do not need extra suppressors.
Fitting resistive plug caps and an in-line suppressor
Both plug caps and suppressors have pointed screws which simply screw into the ends of the lead, without any need to remove insulation.
Fit the in-line suppressor anywhere in the coil lead.
Carbon leads are sold as complete sets, with the distributor and coil connections and plug caps already crimped on.
Simply remove the old leads, one at a time to avoid confusion, and replace with the new ones.
To replace copper leads, buy the right total length of cable, a new set of resistive plug caps and an in-line suppressor (both described in Identifying and suppressing radio interference) and any terminals you may need.
Note that when fitting or removing plug leads you should always push or pull the cap, not the lead, to avoid straining the lead and possibly pulling it away from its terminal connector.
Leads sometimes run through guides which hold them apart or away from hot,areas. Always refit them in their guides.
Types of lead and connectors
Types of HT lead
You can tell copper-cored cable by its stiffness, especially when cold, and by the type of connectors fitted to it. Carbon-cored cable is quite flexible - but do not kink it, as the core snaps easily. Carbon cable has resistance marked on the insulating sheath.
Carbon-cored cable has terminals already crimped on. These are a push-in fit to the distributor and coil, and are covered by rubber dust seals. Ease back the seals along the lead and fit the connectors into the coil and distributor caps. Fix the dust seals.
Copper-cored cable uses screw-on connectors which you fit yourself after cutting the cable to the correct length. There may be a screw collar over a terminal which you crimp on with pliers, or a terminal washer over which the strands are splayed. A screw collar then clamps the washer on to its connection. A third type has a screw which pierces the strands of the core.
Fitting a connector to copper-cored cable
To fit a crimp-on terminal to a coil lead, pass the core wires through the centre hole.
When fitting a screw-on connector to copper-cored cable using a crimp-on terminal or a washer, remove about z in. (13 mm) of insulation from the end of the lead with a sharp knife. Take care not to cut into the wire core. Thread on the collar. Fit a crimp-on terminal by folding up the wings and flattening them with pliers. Fit a terminal washer by threading the core through the washer and bending the strands back around it.
For a screw terminal, do not remove any insulation. Insert the lead into the connector, making sure that the screw is in line with the cable core. Tighten the screw to pierce the core.
Squeeze the terminal arms with pliers so that the spikes bite into the insulation. Splay the wires around the terminal end.
Screw each connection to the appropriate terminal on the distributor cap; that is, No. 1 lead to No. 1 terminal and so on. It has a pointed screw which pierces and expands the core as you tighten the collar. Thread the leads through guide tubes, if any, then fit plug caps, and in-line suppressor if necessary.


