
Si prefiere, nuestro traductor, y solicitarle que lo realice antes.
Posiblemente necesite
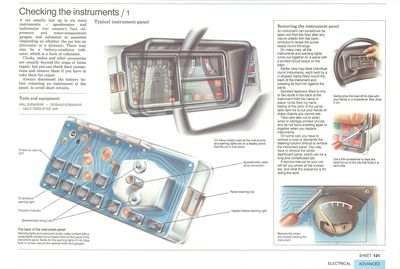
Typical instrument panel
On many modern cars all the instruments and warning lights are on a display panel that lifts out in one piece.
A car usually has up to six main instruments — speedometer and tachometer (rev counter); fuel, oil-pressure and water-temperature gauges; and voltmeter or ammeter (depending on whether the car has an alternator or a dynamo). There may also be a battery-condition indicator, which is a form of voltmeter.
Clocks, radios and other accessories are usually beyond the scope of home repair, but you can check their connections and remove them if you have to take them for repair.
Always disconnect the battery before removing an instrument or the panel, to avoid short circuits.
The back of the instrument panel
Warning lights and instrument bulbs make contact with a replaceable printed-circuit board fixed on the back of the instrument panel. Bulbs for the warning lights fit into clips. Nuts or screws secure the speedometer and gauges.
Removing the instrument panel
Gently prise the cowl off its clips with your hands or a screwdriver, then draw it out.
An instrument can sometimes be taken out from the front after any clip-on plastic trim has been removed to reveal the screw heads round the edge.
On many cars, all the instruments and warning lights come out together on a panel with a printed-circuit board on the back.
Earlier cars may have individual round instruments, each held by a U-shaped clamp fitter round the back of the instrument and pressing its front rim against the panel.
Use a thin screwdriver to ease the panel lip out of the clip that holds it at each side.
Serrated fasteners fitted to one or two studs in the back of the instrument hold th clamp in place. Undo them by hand, feeling at the back of the panel; taking care not to cut your hand on sharp objects you cannot see.
Take care also not to strain wires or damage printed circuits and do not force anything apart or together when you replace instruments.
Remove the cross-head screws holding the instrument.
On some cars you have to remove a cowl or dismantle the steering-column shroud to remove the instrument panel. You may have to remove the whole dashboard panel, which can be a long and complicated job.
A service manual for your car will tell you where all the screws are, and what the sequence is for doing the work.
Testing the speedometer
Testing an instrument across the car battery
Connect one side of a circuit tester to the battery earth terminal. With the instrument removed from the car, tough one of its terminals to the other battery terminal. Connect the tester to the other instrument terminal. The lamp should light and the instrument needle should register. If there is no light or no movement, the instrument is faulty.
A speedometer seldom goes wrong - usually only its mechanically operated drive cable gives trouble (See Fitting a new speedometer cable).
Any noises are generally caused by the cable, but if you are sure that a ticking noise is in fact coming from the instrument, or if it starts screeching loudly, the only cure is to fit a new unit or have it repaired.
Ask your local garage for the nearest repair specialist.
Test that the speedometer drive cable is turning normally by disconnecting it at the gearbox end (See Fitting a new speedometer cable) and turning it by hand while a helper watches the speedometer needle.
If the speedometer fails to register although the cable is turning normally, fit a new instrument.
Sometimes the speedometer responds sluggishly or the pointer swings unsteadily. The cause is oil from the cable getting into the mechanism.
Testing the tachometer (rev counter)
Most later models of car have electronically operated tachometers. Earlier types were mechanically driven, and some worked through a voltmeter. You cannot repair any type of tachometer yourself.
If, however, the tachometer reads wrongly but the engine runs normally, the fault may be in the wiring to the instrument.
Use a battery and circuit tester to check that the wires are unbroken. Clean and tighten all the connections.
If the instrument is still faulty, remove it and take it to an auto-electrician for testing and repair or exchange.
Testing the voltmeter or ammeter
One or other of these instruments is connected to the main feed to all the car electrics.
If these work therefore, the circuit is sound. If the instrument reading is obviously wrong, it is faulty. Fit a new one.
Testing the battery-condition indicator
The indicator is a voltmeter connected to the battery. If it gives an obviously wrong reading, remove it and connect it directly across the battery terminals.
It should register full battery voltage; if it does, check the wiring for a faulty connection or a break. If it still reads the same as before, the instrument itself is faulty. Replace it.
Testing fuel, oil and temperature gauges
In modern cars the fuel, oil-pressure and coolant temperature gauges all work in the same way, and the only difference between them is the marking on the dial.
Earlier cars have mechanical oil-pressure gauges connected to the engine by a thin metal tube.
Modern instruments, known as 'hot wire' instruments, respond to changes in electric voltage received from a remote transmitter - the sender unit in the fuel tank, a heat sensor in the cooling system and a pressure sensor in the engine main oil gallery.
Inside the instrument, the current heats a wire which expands and moves a small needle.
Locating the instrument voltage stabiliser
The IVS is often fitted behind the instrument panel. It usually clips in, and has a holding screw as well.
Fluctuations in battery voltage would affect the hot-wire instrument reading, so the instruments are fed with voltage stabilised at 8 or 10 volts by an instrument voltage stabiliser (IVS) fitted either behind the instruments or on the bulkhead.
If all three instruments of this group read too high or too low (find the correct temperature and oil-pressure readings in your handbook) the fault must be with the IVS.
If all are registering zero, check whether current is reaching them.
Connect a small test lamp with a 12 volt, 2.2 watt panel-light bulb (not larger) between the feed terminal of the IVS and earth. Provided the ignition is on, the lamp should light.
If the current is available, check between the output terminal and earth. If there is no light, the IVS has failed and must be renewed.
If the instruments are all registering much too high, the IVS earth connection is probably faulty. Connect another earth wire between one of its fixing screws and the car body.
If only one gauge is giving trouble, the fault is in either the gauge, its sender or sensor unit, or its wiring.
To check the gauge, swap its connecting leads with those of another IVS-supplied gauge. If the gauge still does not register but the other one does, the gauge itself is faulty. Fit a new one.
Where there is only one IVS-supplied gauge, disconnect the wire at the sender or sensor unit and earth it. Switch on the ignition, and watch the gauge.
If the needle moves, switch off quickly before it reaches maximum. It may become bent if it strikes the gauge end-stop. Movement means that the gauge and wiring are sound, so the sender or sensor unit must be where the fault lies. Fit a new one (see below, or Checking and replacing a fuel sender unit for the fuel-tank sender unit).
If the needle does not move, disconnect the wire from the gauge and clip a test lead between the output terminal of the gauge and the earth, to cut out the wiring.
If the needle now moves, with the ignition on, the wiring is faulty. If it does not move, the gauge is faulty. Fit a new one.
Fitting a new sensor unit
To remove a coolant-temperature sensor, first drain off the coolant to below the level of the sensor.
Check the position of the unit whether an oil-pressure sensor unit or a coolant-temperature sensor unit - in a workshop manual for the car.
Remove and replace the unit when the engine is cold. On most cars, each unit is screwed into the cylinder head or engine block.
Changing dashboard bulbs
Bulbs pull straight out from spring-clip holders. Some cars have bayonet holders.
On later cars, warning-light bulbs, and sometimes instrument bulbs, fit into a printed circuit board.
The board is behind the instrument panel and come off in one piece. It usually has to be removed from the panel for bulbs to be changed.
Handle the delicate circuit board with care and do not pull the multi-pin connector that links it to the main wiring.
The bulbs are usually capless and are a push-fit into a holder. The holder is a bayonet-fit into the circuit board. Turn it a little anti-clockwise to lift it out.
In some cars, capless bulbs are a push-fit directly into spring clips on the boar. They pull straight out.
Earlier cars have bulbs with a screw or bayonet base fitting into a holder. The holder pulls straight out from behind its instrument for removal of the bulb.
Any light fitting can fail because of dirty, loose or bent contacts. Look closely at the contacts as well as the bulb.


